
Day 42 / 63 · Network services
SSH
Study notes based primarily on Jeremy’s IT Lab CCNA learning videos. Credit to Jeremy’s IT Lab for the source lessons and diagrams.
SSH
Download original PDF
Text view — SSH
Extracted from the original export. Diagrams and some formatting appear in the notes above.
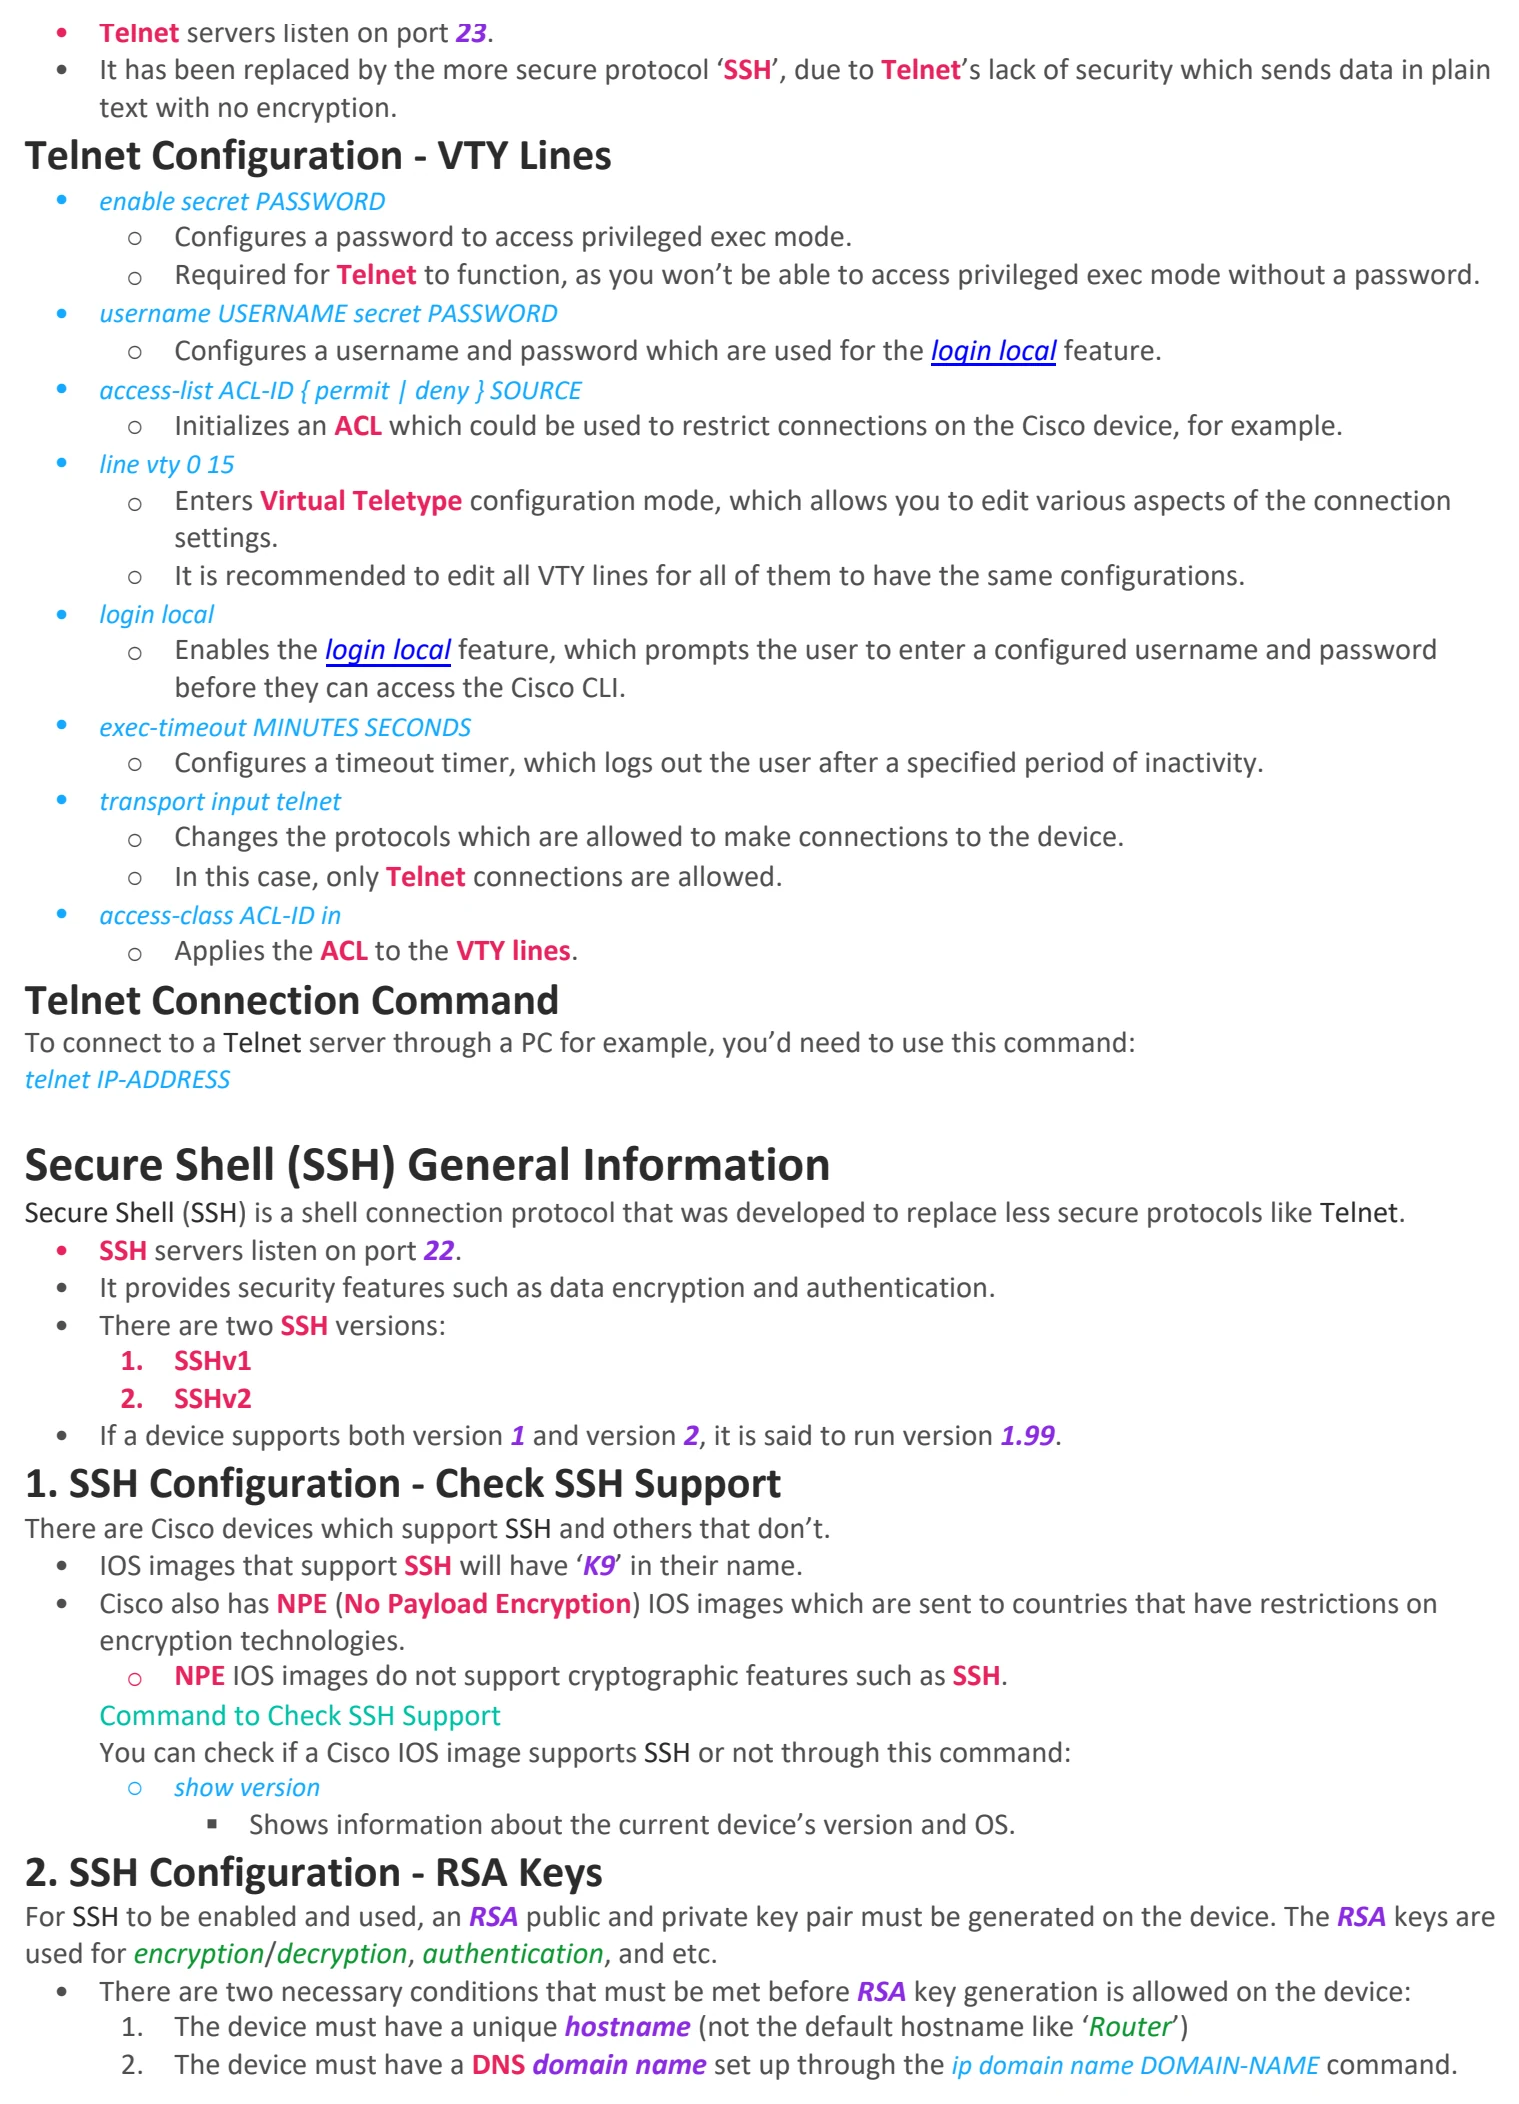
Day 42 - SSH
Wednesday, September 9, 2026 8:37 PM
SSH Info
Console Port Security
1. Login
You can configure a password on the console line of a Cisco IOS device by entering console line configuration mode and
using a few commands:
• line console 0
○ Enters the console line configuration mode. There’s only one single console line, that’s why we specified a
value of ‘0’.
• password PASSWORD
○ Assigns a password for the console line to be accessed.
• login
○ Enables the login feature, which prompts the user to enter the console line’s password before they can
access the Cisco CLI.
2. Login Local
The console line can also be configured to require users to login using one of the configured usernames and passwords
on the device through these commands:
• username USERNAME secret PASSWORD
○ Configures the username and password to be used when users log into the Cisco CLI.
• line console 0
○ Enters the console line configuration mode. There’s only one single console line, that’s why we specified a
value of ‘0’.
• login local
○ Enables the login local feature, which prompts the user to enter a configured username and password
before they can access the Cisco CLI.
Default login settings
○ By default, no password is needed access the Cisco CLI of a Cisco IOS device via the console port.
Login & Login Local
○ If both login and login local are enabled on the device at the same time, then the login local will take priority
over the other setting and will be used for authentication.
Layer 2 Switch - Management IP
Layer 2 switches are not IP routing aware, as in they don’t perform packet routing and don’t build routing tables. In this
situation, we cannot connect to the switch through Telnet/SSH and perform management configurations.
• However, an IP address can be assigned onto a Switch Virtual Interface (SVI) to allow remote connections to the
CLI of the switch. (Through Telnet/SSH)
• To perform that, you’d have to create an SVI through the interface vlan NUMBER command, assign it an IP address
and enable it through the no shutdown command.
• Then, you configure the switch’s default gateway to a router in its LAN through the ip default-gateway IP-ADDRESS
command.
The Importance of a Switch's Default Gateway
○ If the switch doesn’t have a default gateway to a router in its LAN, it cannot communicate with PCs which
are outside of its LAN, therefore, Telnet/SSH communications cannot be made.
Telnet General Information
Teletype Network (Telnet) is an old protocol used to remotely access the CLI of a remote host.
• Telnet servers listen on port 23.
• It has been replaced by the more secure protocol ‘SSH’, due to Telnet’s lack of security which sends data in plain
text with no encryption.
Telnet Configuration - VTY Lines
• enable secret PASSWORD
○ Configures a password to access privileged exec mode.
○ Required for Telnet to function, as you won’t be able to access privileged exec mode without a password.
• username USERNAME secret PASSWORD
○ Configures a username and password which are used for the login local feature.
• access-list ACL-ID { permit | deny } SOURCE
○ Initializes an ACL which could be used to restrict connections on the Cisco device, for example.
• line vty 0 15
○ Enters Virtual Teletype configuration mode, which allows you to edit various aspects of the connection
settings.
○ It is recommended to edit all VTY lines for all of them to have the same configurations.
• login local
○ Enables the login local feature, which prompts the user to enter a configured username and password
before they can access the Cisco CLI.
• exec-timeout MINUTES SECONDS
○ Configures a timeout timer, which logs out the user after a specified period of inactivity.
• transport input telnet
○ Changes the protocols which are allowed to make connections to the device.
○ In this case, only Telnet connections are allowed.
• access-class ACL-ID in
○ Applies the ACL to the VTY lines.
Telnet Connection Command
To connect to a Telnet server through a PC for example, you’d need to use this command:
telnet IP-ADDRESS
Secure Shell (SSH) General Information
Secure Shell (SSH) is a shell connection protocol that was developed to replace less secure protocols like Telnet.
• SSH servers listen on port 22.
• It provides security features such as data encryption and authentication.
• There are two SSH versions:
1. SSHv1
2. SSHv2
• If a device supports both version 1 and version 2, it is said to run version 1.99.
1. SSH Configuration - Check SSH Support
There are Cisco devices which support SSH and others that don’t.
• IOS images that support SSH will have ‘K9’ in their name.
• Cisco also has NPE (No Payload Encryption) IOS images which are sent to countries that have restrictions on
encryption technologies.
○ NPE IOS images do not support cryptographic features such as SSH.
Command to Check SSH Support
You can check if a Cisco IOS image supports SSH or not through this command:
○ show version
§ Shows information about the current device’s version and OS.
2. SSH Configuration - RSA Keys
For SSH to be enabled and used, an RSA public and private key pair must be generated on the device. The RSA keys are
used for encryption/decryption, authentication, and etc.
• There are two necessary conditions that must be met before RSA key generation is allowed on the device:
1. The device must have a unique hostname (not the default hostname like ‘Router’)
2. The device must have a DNS domain name set up through the ip domain name DOMAIN-NAME command.
(Also known as a Fully Qualified Domain Name [FQDN])
• When these two conditions are met, you can use the crypto key generate rsa command in order to generate RSA
keys on the current device.
○ A modulus size must be inputted afterwards.
○ The minimum modulus size is 768 bits for SSHv2.
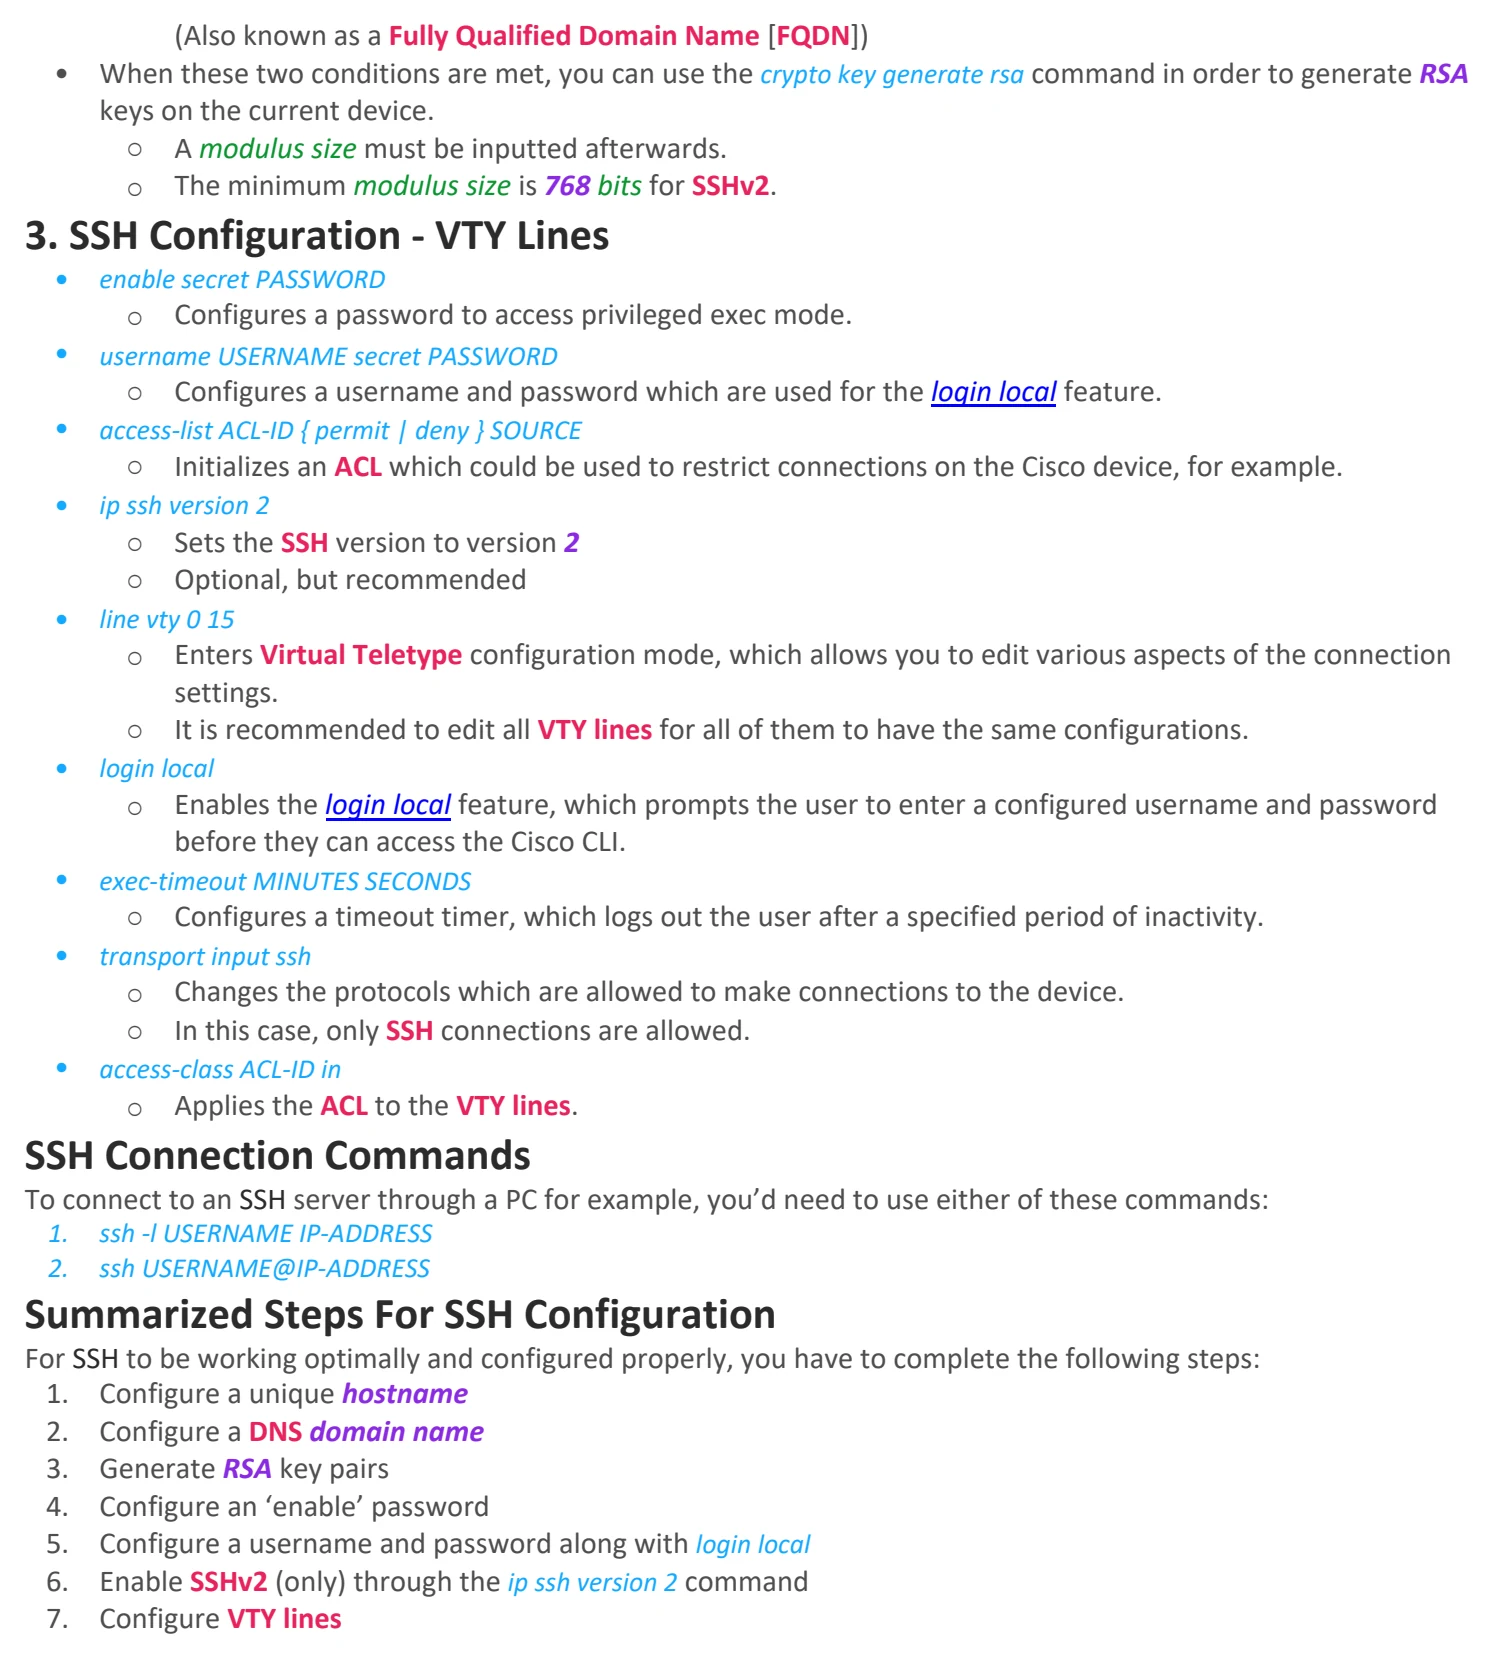
3. SSH Configuration - VTY Lines
• enable secret PASSWORD
○ Configures a password to access privileged exec mode.
• username USERNAME secret PASSWORD
○ Configures a username and password which are used for the login local feature.
• access-list ACL-ID { permit | deny } SOURCE
○ Initializes an ACL which could be used to restrict connections on the Cisco device, for example.
• ip ssh version 2
○ Sets the SSH version to version 2
○ Optional, but recommended
• line vty 0 15
○ Enters Virtual Teletype configuration mode, which allows you to edit various aspects of the connection
settings.
○ It is recommended to edit all VTY lines for all of them to have the same configurations.
• login local
○ Enables the login local feature, which prompts the user to enter a configured username and password
before they can access the Cisco CLI.
• exec-timeout MINUTES SECONDS
○ Configures a timeout timer, which logs out the user after a specified period of inactivity.
• transport input ssh
○ Changes the protocols which are allowed to make connections to the device.
○ In this case, only SSH connections are allowed.
• access-class ACL-ID in
○ Applies the ACL to the VTY lines.
SSH Connection Commands
To connect to an SSH server through a PC for example, you’d need to use either of these commands:
1. ssh -l USERNAME IP-ADDRESS
2. ssh USERNAME@IP-ADDRESS
Summarized Steps For SSH Configuration
For SSH to be working optimally and configured properly, you have to complete the following steps:
1. Configure a unique hostname
2. Configure a DNS domain name
3. Generate RSA key pairs
4. Configure an ‘enable’ password
5. Configure a username and password along with login local
6. Enable SSHv2 (only) through the ip ssh version 2 command
7. Configure VTY lines

Day 42 - SSH
Wednesday, September 9, 2026 8:37 PM
SSH Info
Console Port Security
1. Login
You can configure a password on the console line of a Cisco IOS device by entering console line configuration mode and
using a few commands:
• line console 0
○ Enters the console line configuration mode. There’s only one single console line, that’s why we specified a
value of ‘0’.
• password PASSWORD
○ Assigns a password for the console line to be accessed.
• login
○ Enables the login feature, which prompts the user to enter the console line’s password before they can
access the Cisco CLI.
2. Login Local
The console line can also be configured to require users to login using one of the configured usernames and passwords
on the device through these commands:
• username USERNAME secret PASSWORD
○ Configures the username and password to be used when users log into the Cisco CLI.
• line console 0
○ Enters the console line configuration mode. There’s only one single console line, that’s why we specified a
value of ‘0’.
• login local
○ Enables the login local feature, which prompts the user to enter a configured username and password
before they can access the Cisco CLI.
Default login settings
○ By default, no password is needed access the Cisco CLI of a Cisco IOS device via the console port.
Login & Login Local
○ If both login and login local are enabled on the device at the same time, then the login local will take priority
over the other setting and will be used for authentication.
Layer 2 Switch - Management IP
Layer 2 switches are not IP routing aware, as in they don’t perform packet routing and don’t build routing tables. In this
situation, we cannot connect to the switch through Telnet/SSH and perform management configurations.
• However, an IP address can be assigned onto a Switch Virtual Interface (SVI) to allow remote connections to the
CLI of the switch. (Through Telnet/SSH)
• To perform that, you’d have to create an SVI through the interface vlan NUMBER command, assign it an IP address
and enable it through the no shutdown command.
• Then, you configure the switch’s default gateway to a router in its LAN through the ip default-gateway IP-ADDRESS
command.
The Importance of a Switch's Default Gateway
○ If the switch doesn’t have a default gateway to a router in its LAN, it cannot communicate with PCs which
are outside of its LAN, therefore, Telnet/SSH communications cannot be made.
Telnet General Information
Teletype Network (Telnet) is an old protocol used to remotely access the CLI of a remote host.
• Telnet servers listen on port 23.
• It has been replaced by the more secure protocol ‘SSH’, due to Telnet’s lack of security which sends data in plain
text with no encryption.
Telnet Configuration - VTY Lines
• enable secret PASSWORD
○ Configures a password to access privileged exec mode.
○ Required for Telnet to function, as you won’t be able to access privileged exec mode without a password.
• username USERNAME secret PASSWORD
○ Configures a username and password which are used for the login local feature.
• access-list ACL-ID { permit | deny } SOURCE
○ Initializes an ACL which could be used to restrict connections on the Cisco device, for example.
• line vty 0 15
○ Enters Virtual Teletype configuration mode, which allows you to edit various aspects of the connection
settings.
○ It is recommended to edit all VTY lines for all of them to have the same configurations.
• login local
○ Enables the login local feature, which prompts the user to enter a configured username and password
before they can access the Cisco CLI.
• exec-timeout MINUTES SECONDS
○ Configures a timeout timer, which logs out the user after a specified period of inactivity.
• transport input telnet
○ Changes the protocols which are allowed to make connections to the device.
○ In this case, only Telnet connections are allowed.
• access-class ACL-ID in
○ Applies the ACL to the VTY lines.
Telnet Connection Command
To connect to a Telnet server through a PC for example, you’d need to use this command:
telnet IP-ADDRESS
Secure Shell (SSH) General Information
Secure Shell (SSH) is a shell connection protocol that was developed to replace less secure protocols like Telnet.
• SSH servers listen on port 22.
• It provides security features such as data encryption and authentication.
• There are two SSH versions:
1. SSHv1
2. SSHv2
• If a device supports both version 1 and version 2, it is said to run version 1.99.
1. SSH Configuration - Check SSH Support
There are Cisco devices which support SSH and others that don’t.
• IOS images that support SSH will have ‘K9’ in their name.
• Cisco also has NPE (No Payload Encryption) IOS images which are sent to countries that have restrictions on
encryption technologies.
○ NPE IOS images do not support cryptographic features such as SSH.
Command to Check SSH Support
You can check if a Cisco IOS image supports SSH or not through this command:
○ show version
§ Shows information about the current device’s version and OS.
2. SSH Configuration - RSA Keys
For SSH to be enabled and used, an RSA public and private key pair must be generated on the device. The RSA keys are
used for encryption/decryption, authentication, and etc.
• There are two necessary conditions that must be met before RSA key generation is allowed on the device:
1. The device must have a unique hostname (not the default hostname like ‘Router’)
2. The device must have a DNS domain name set up through the ip domain name DOMAIN-NAME command.
(Also known as a Fully Qualified Domain Name [FQDN])
• When these two conditions are met, you can use the crypto key generate rsa command in order to generate RSA
keys on the current device.
○ A modulus size must be inputted afterwards.
○ The minimum modulus size is 768 bits for SSHv2.
3. SSH Configuration - VTY Lines
• enable secret PASSWORD
○ Configures a password to access privileged exec mode.
• username USERNAME secret PASSWORD
○ Configures a username and password which are used for the login local feature.
• access-list ACL-ID { permit | deny } SOURCE
○ Initializes an ACL which could be used to restrict connections on the Cisco device, for example.
• ip ssh version 2
○ Sets the SSH version to version 2
○ Optional, but recommended
• line vty 0 15
○ Enters Virtual Teletype configuration mode, which allows you to edit various aspects of the connection
settings.
○ It is recommended to edit all VTY lines for all of them to have the same configurations.
• login local
○ Enables the login local feature, which prompts the user to enter a configured username and password
before they can access the Cisco CLI.
• exec-timeout MINUTES SECONDS
○ Configures a timeout timer, which logs out the user after a specified period of inactivity.
• transport input ssh
○ Changes the protocols which are allowed to make connections to the device.
○ In this case, only SSH connections are allowed.
• access-class ACL-ID in
○ Applies the ACL to the VTY lines.
SSH Connection Commands
To connect to an SSH server through a PC for example, you’d need to use either of these commands:
1. ssh -l USERNAME IP-ADDRESS
2. ssh USERNAME@IP-ADDRESS
Summarized Steps For SSH Configuration
For SSH to be working optimally and configured properly, you have to complete the following steps:
1. Configure a unique hostname
2. Configure a DNS domain name
3. Generate RSA key pairs
4. Configure an ‘enable’ password
5. Configure a username and password along with login local
6. Enable SSHv2 (only) through the ip ssh version 2 command
7. Configure VTY lines

Day 42 - SSH
Wednesday, September 9, 2026 8:37 PM
SSH Info
Console Port Security
1. Login
You can configure a password on the console line of a Cisco IOS device by entering console line configuration mode and
using a few commands:
• line console 0
○ Enters the console line configuration mode. There’s only one single console line, that’s why we specified a
value of ‘0’.
• password PASSWORD
○ Assigns a password for the console line to be accessed.
• login
○ Enables the login feature, which prompts the user to enter the console line’s password before they can
access the Cisco CLI.
2. Login Local
The console line can also be configured to require users to login using one of the configured usernames and passwords
on the device through these commands:
• username USERNAME secret PASSWORD
○ Configures the username and password to be used when users log into the Cisco CLI.
• line console 0
○ Enters the console line configuration mode. There’s only one single console line, that’s why we specified a
value of ‘0’.
• login local
○ Enables the login local feature, which prompts the user to enter a configured username and password
before they can access the Cisco CLI.
Default login settings
○ By default, no password is needed access the Cisco CLI of a Cisco IOS device via the console port.
Login & Login Local
○ If both login and login local are enabled on the device at the same time, then the login local will take priority
over the other setting and will be used for authentication.
Layer 2 Switch - Management IP
Layer 2 switches are not IP routing aware, as in they don’t perform packet routing and don’t build routing tables. In this
situation, we cannot connect to the switch through Telnet/SSH and perform management configurations.
• However, an IP address can be assigned onto a Switch Virtual Interface (SVI) to allow remote connections to the
CLI of the switch. (Through Telnet/SSH)
• To perform that, you’d have to create an SVI through the interface vlan NUMBER command, assign it an IP address
and enable it through the no shutdown command.
• Then, you configure the switch’s default gateway to a router in its LAN through the ip default-gateway IP-ADDRESS
command.
The Importance of a Switch's Default Gateway
○ If the switch doesn’t have a default gateway to a router in its LAN, it cannot communicate with PCs which
are outside of its LAN, therefore, Telnet/SSH communications cannot be made.
Telnet General Information
Teletype Network (Telnet) is an old protocol used to remotely access the CLI of a remote host.
• Telnet servers listen on port 23.
• It has been replaced by the more secure protocol ‘SSH’, due to Telnet’s lack of security which sends data in plain
text with no encryption.
Telnet Configuration - VTY Lines
• enable secret PASSWORD
○ Configures a password to access privileged exec mode.
○ Required for Telnet to function, as you won’t be able to access privileged exec mode without a password.
• username USERNAME secret PASSWORD
○ Configures a username and password which are used for the login local feature.
• access-list ACL-ID { permit | deny } SOURCE
○ Initializes an ACL which could be used to restrict connections on the Cisco device, for example.
• line vty 0 15
○ Enters Virtual Teletype configuration mode, which allows you to edit various aspects of the connection
settings.
○ It is recommended to edit all VTY lines for all of them to have the same configurations.
• login local
○ Enables the login local feature, which prompts the user to enter a configured username and password
before they can access the Cisco CLI.
• exec-timeout MINUTES SECONDS
○ Configures a timeout timer, which logs out the user after a specified period of inactivity.
• transport input telnet
○ Changes the protocols which are allowed to make connections to the device.
○ In this case, only Telnet connections are allowed.
• access-class ACL-ID in
○ Applies the ACL to the VTY lines.
Telnet Connection Command
To connect to a Telnet server through a PC for example, you’d need to use this command:
telnet IP-ADDRESS
Secure Shell (SSH) General Information
Secure Shell (SSH) is a shell connection protocol that was developed to replace less secure protocols like Telnet.
• SSH servers listen on port 22.
• It provides security features such as data encryption and authentication.
• There are two SSH versions:
1. SSHv1
2. SSHv2
• If a device supports both version 1 and version 2, it is said to run version 1.99.
1. SSH Configuration - Check SSH Support
There are Cisco devices which support SSH and others that don’t.
• IOS images that support SSH will have ‘K9’ in their name.
• Cisco also has NPE (No Payload Encryption) IOS images which are sent to countries that have restrictions on
encryption technologies.
○ NPE IOS images do not support cryptographic features such as SSH.
Command to Check SSH Support
You can check if a Cisco IOS image supports SSH or not through this command:
○ show version
§ Shows information about the current device’s version and OS.
2. SSH Configuration - RSA Keys
For SSH to be enabled and used, an RSA public and private key pair must be generated on the device. The RSA keys are
used for encryption/decryption, authentication, and etc.
• There are two necessary conditions that must be met before RSA key generation is allowed on the device:
1. The device must have a unique hostname (not the default hostname like ‘Router’)
2. The device must have a DNS domain name set up through the ip domain name DOMAIN-NAME command.
(Also known as a Fully Qualified Domain Name [FQDN])
• When these two conditions are met, you can use the crypto key generate rsa command in order to generate RSA
keys on the current device.
○ A modulus size must be inputted afterwards.
○ The minimum modulus size is 768 bits for SSHv2.
3. SSH Configuration - VTY Lines
• enable secret PASSWORD
○ Configures a password to access privileged exec mode.
• username USERNAME secret PASSWORD
○ Configures a username and password which are used for the login local feature.
• access-list ACL-ID { permit | deny } SOURCE
○ Initializes an ACL which could be used to restrict connections on the Cisco device, for example.
• ip ssh version 2
○ Sets the SSH version to version 2
○ Optional, but recommended
• line vty 0 15
○ Enters Virtual Teletype configuration mode, which allows you to edit various aspects of the connection
settings.
○ It is recommended to edit all VTY lines for all of them to have the same configurations.
• login local
○ Enables the login local feature, which prompts the user to enter a configured username and password
before they can access the Cisco CLI.
• exec-timeout MINUTES SECONDS
○ Configures a timeout timer, which logs out the user after a specified period of inactivity.
• transport input ssh
○ Changes the protocols which are allowed to make connections to the device.
○ In this case, only SSH connections are allowed.
• access-class ACL-ID in
○ Applies the ACL to the VTY lines.
SSH Connection Commands
To connect to an SSH server through a PC for example, you’d need to use either of these commands:
1. ssh -l USERNAME IP-ADDRESS
2. ssh USERNAME@IP-ADDRESS
Summarized Steps For SSH Configuration
For SSH to be working optimally and configured properly, you have to complete the following steps:
1. Configure a unique hostname
2. Configure a DNS domain name
3. Generate RSA key pairs
4. Configure an ‘enable’ password
5. Configure a username and password along with login local
6. Enable SSHv2 (only) through the ip ssh version 2 command
7. Configure VTY lines